MQTT over TLS-PSK with the ESP32 and Mongoose-OS

This article is an extension to this one; I suggest you read it first.

Should you need more information on the MQTT client and using it with no TLS, read this article. For a bit more on TLS, this one.

TLS-PSK

There is a simpler solution to using full-blown TLS as we’ve seen on our first article; instead of using certificates, broker and connecting device can have a pre-shared key (PSK).

The connection process is similar, but in this case, instead of validating certificates and generating a derived key, the process starts with the pre-shared key. Depending on the scheme being used, demanding Public Key Cryptography operations can be avoided, and key management logistics can be a bit simpler, plus, we don’t need a CA (Certification Authority) anymore.

Even though there are currently three different ways to work, where one of these allows broker validation using certificates and device validation using a PSK, we’ve only tested the simplest form.

Configuration

Let’s configure the ESP32 running Mongoose-OS to use TLS-PSK.

libs:
  - origin: https://github.com/mongoose-os-libs/mqtt  # Include the MQTT client
config_schema:
  - ["mqtt.enable", true]             # Enable the MQTT client
  - ["mqtt.server", "address:port"]   # Broker IP address (and port)
  - ["mqtt.ssl_psk_identity", "bob"]  # identity to use for our key
  - ["mqtt.ssl_psk_key", "000000000000000000000000deadbeef"] # key AES-128 (or 256)
  - ["mqtt.ssl_cipher_suites", "TLS-PSK-WITH-AES-128-CCM-8:TLS-PSK-WITH-AES-128-GCM-SHA256:TLS-ECDHE-PSK-WITH-AES-128-CBC-SHA256:TLS-PSK-WITH-AES-128-CBC-SHA"] # cipher suites

The most common port for MQTT over TLS-PSK is 8883. The broker can also request we send a username and password, though the usual stuff is to configure it to take advantage of the identity we’re already sending, as we did on these tests (example below).

Regarding cipher suites, we need to provide a set of cryptographic schemes supported by our device, and at least one of them must also be supported by the broker. This is a mandatory parameter, otherwise our device won’t announce any TLS-PSK compatible cipher suite and TLS connection will not take place. Usually we negotiate this with the broker admins.

When starting the TLS connection, the device sends its supported cipher suites in its ClientHello message; the broker then chooses one that it supports and indicates this on its ServerHello message. As we’ve obtained this list by analyzing the source code, we decided to publish it here so it can be of use. In our particular case, only one of the device cipher suites was also supported by the broker: TLS-PSK-WITH-AES-128-CCM-8. The start handshake with these messages can be seen at the Wireshark snapshot below.

Finally, our pre-shared key (PSK, parameter ssl_psk_key) must be a 128-bit (16-byte) quantity for AES-128 suites and a 256-bit (32-byte) quantity for AES-256 suites.

Operation

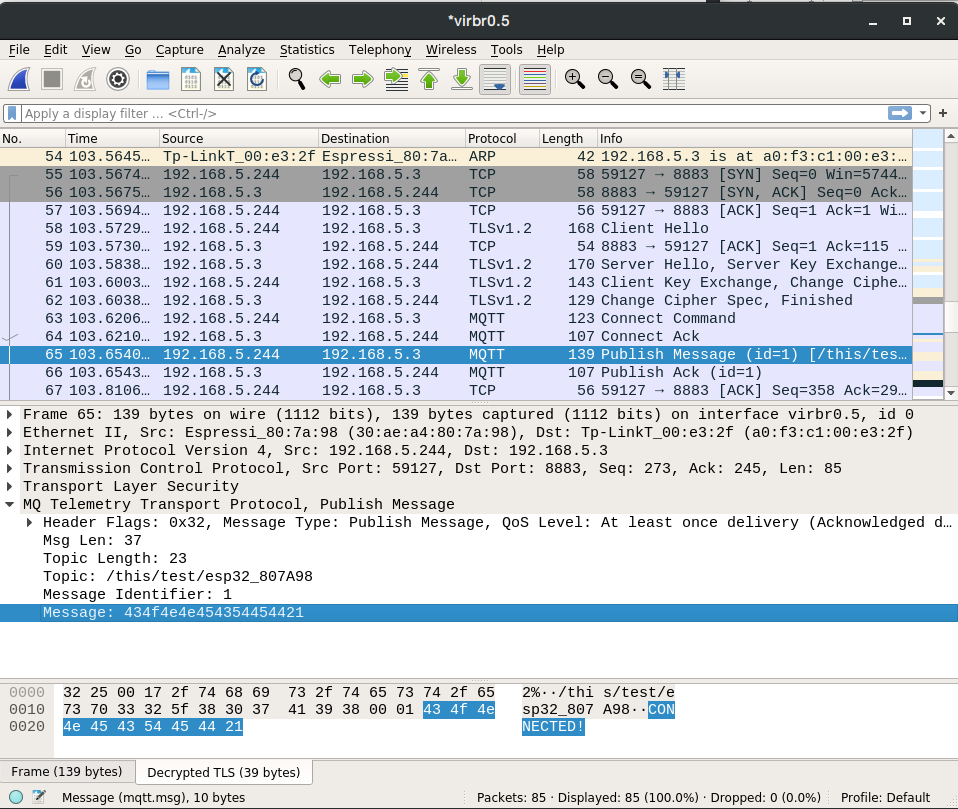
At startup, we’ll watch the log and check if everything is going on as it should, or catch any possible errors. In this sad case, it is pretty hard to properly determine what is going on without a sniffer, as both sides are often not very verbose nor precise. The handshake, as well as the MQTT messages inside TLS, can be observed with a sniffer, by introducing the proper key (see the example using Wireshark below).

[Mar 31 17:28:32.349] mgos_mqtt_conn.c:435    MQTT0 connecting to 192.168.5.3:8883
[Mar 31 17:28:32.368] mongoose.c:4906         0x3ffc76ac ciphersuite: TLS-PSK-WITH-AES-128-CBC-SHA
[Mar 31 17:28:32.398] mgos_mqtt_conn.c:188    MQTT0 TCP connect ok (0)
[Mar 31 17:28:32.411] mgos_mqtt_conn.c:235    MQTT0 CONNACK 0
[Mar 31 17:28:32.420] init.js:34              MQTT connected
[Mar 31 17:28:32.434] init.js:26              Published:OK topic:/this/test/esp32_807A98 msg:CONNECTED!

Brokers: Mosquitto

This is a minimal configuration for Mosquitto, take it as a quick help and not as a reference. Paths are in GNU/Linux form and we should put our keys there.

listener 8883 192.168.5.1
log_dest syslog
use_identity_as_username true # so the broker does not ask for username in the MQTT header
psk_file /etc/mosquitto/pskfile
psk_hint cualquiera           # any name

Parameter psk_hint serves as a hint for the client on which identity to use, in case it connects to several places; we don’t use it in this example.

The file pskfile must contain each identity and its corresponding pre-shared key; for example, for our user bob:

bob:000000000000000000000000deadbeef

Example

Companion example code available in Github.

Sniffers: Wireshark

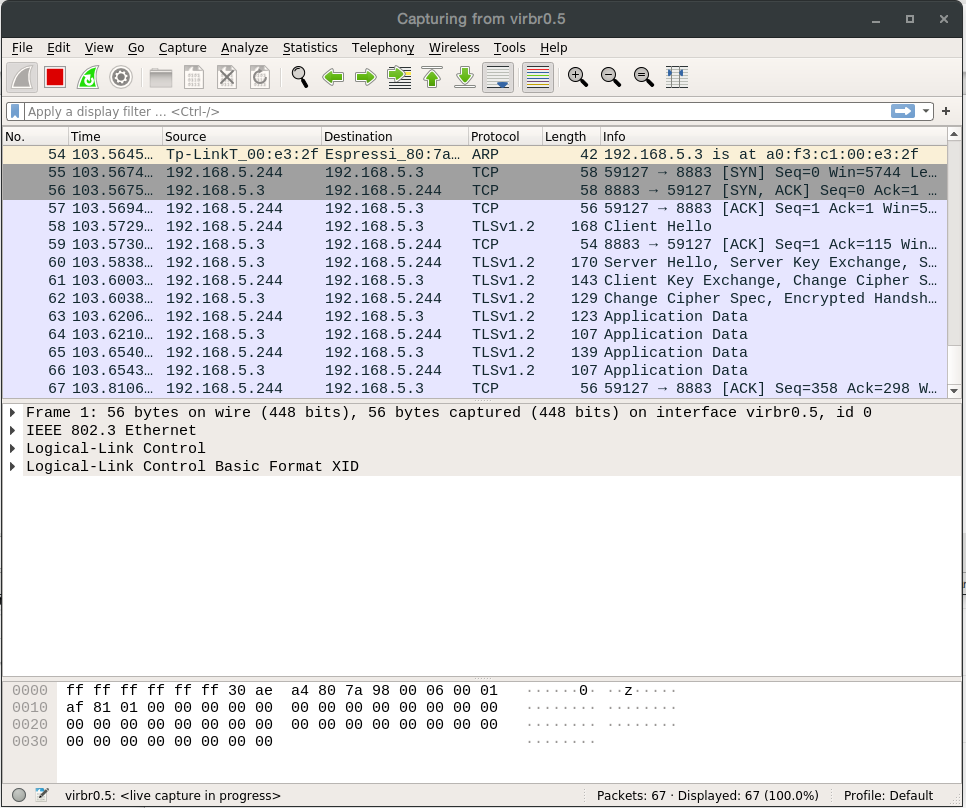
With any sniffer we are able to see the TLS traffic, but not its payload

Standard capture

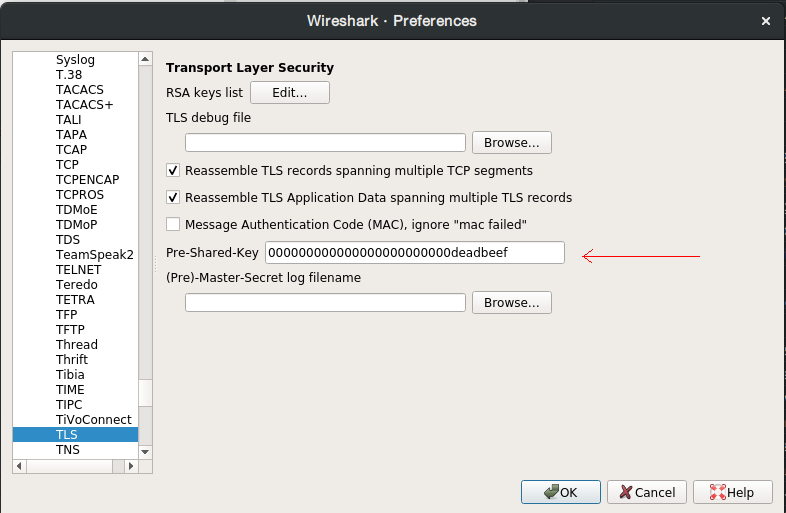
With Wireshark, we can decrypt TLS-PSK entering the desired pre-shared key in Edit->Preferences->Protocols->TLS->Pre-Shared-Key.

Entering the PSK

We are then able to see MQTT traffic as TLS payload.

Decrypted capture

MQTT over TLS with the ESP32 and Mongoose-OS

Mongoose-OS has a built-in MQTT client supporting TLS. This allows us to authenticate the server, but also the server infrastructure is able to authenticate the identity of incoming connections, that is, to validate that they belong to authorized users.

For further information on the MQTT client and using it without TLS, read this article. For more information on TLS, read this one.

Configuration

We’ll configure the ESP32 running Mongoose-OS to use the MQTT client and connect to a WiFi network. Since we are going to connect to a server (the MQTT broker), this is perhaps the simplest and fastest way to run our tests. This action can be done manually using RPCs (Remote Procedural Calls), writing a JSON config file, or it can be defined in the YAML file that describes how the project will be built. We’ve chosen this last option for our tests.

libs:
  - origin: https://github.com/mongoose-os-libs/mqtt  # Include the MQTT client
config_schema:
  - ["mqtt.enable", true]            # Enable the MQTT client
  - ["mqtt.server", "address:port"]  # Broker IP address (and port)
  - ["mqtt.ssl_ca_cert", "ca.crt"]   # Broker certificate, required
  - ["mqtt.ssl_cert", "sandboxclient.crt"]  # our certificate, for mutual authentication
  - ["mqtt.ssl_key", "sandboxclient.key"]   # our key, for mutual authentication

The most common port for MQTT over TLS is 8883. The broker can also ask us to send a username and password, full configuration details are available at the corresponding Mongoose-OS doc page. Finally, it is the broker who decides which type of authentication to use (one- or two-way), though we must provide our certificate when the broker asks for it.

Operation

Before we build our project and execute our code, it is perhaps convenient to have an MQTT client connected to the broker, so we can see the message the device will send at connect time. We’ve used a broker we installed in a server in our lab and connected to it with no authentication, so all we’ve shown in the MQTT article is valid here too.

After the code is compiled and linked (mos build) and the microcontroller’s flash is programmed (mos flash) using mos tool, we’ll watch the log and check if everything is going on as it should, or catch any possible errors. Remember we need to configure the proper access credentials to connect to our WiFi network of choice (SSID and password), and the address and port for the MQTT broker we are going to use. At the end of this note we show how to configure a Mosquitto broker.

One-way authentication

This way we can authenticate the server, that is, we can trust it is the one to whom we want to connect, but the server has no idea who can we be.

This is the simplest configuration and we only have to provide the CA certificate filename in the parameter ssl_ca_cert, the certificate has to be stored in the fs directory. This indicates the broker has to be validated.

[Mar 31 17:21:18.360] mgos_mqtt_conn.c:435    MQTT0 connecting to 192.168.5.3:8883
[Mar 31 17:21:18.585] mongoose.c:4906         0x3ffca41c ciphersuite: TLS-ECDHE-RSA-WITH-AES-128-GCM-SHA256
[Mar 31 17:21:20.404] mgos_mqtt_conn.c:188    MQTT0 TCP connect ok (0)
[Mar 31 17:21:20.414] mgos_mqtt_conn.c:235    MQTT0 CONNACK 0
[Mar 31 17:21:20.423] init.js:34              MQTT connected
[Mar 31 17:21:20.437] init.js:26              Published:OK topic:/this/test/esp32_807A98 msg:CONNECTED!

Two-way (mutual) authentication

This way we can authenticate the server and the client, that is, now the server knows we should be the one who our certificate says we are. This dual process requires lots of processing and we’ll notice that connection establishment takes longer. In this configuration we must provide our certificate and key in the fs directory, and configure parameters ssl_cert and ssl_key appropriately; otherwise the broker might give us a clue in its log, as Mosquitto does:

Mar 31 17:30:52 Server mosquitto[2694]: OpenSSL Error: error:140890C7:SSL routines:ssl3_get_client_certificate:peer did not return a certificate 

Brokers: Mosquitto

These are minimal configurations for Mosquitto, take them as a quick help and not as a reference. Paths are in GNU/Linux form and we should put our certificates there.

One-way authentication (broker authentication)

listener 8883 192.168.5.1
log_dest syslog
cafile /etc/mosquitto/certs/ca.crt
certfile /etc/mosquitto/certs/server.crt
keyfile /etc/mosquitto/certs/server.key

Mutual (two-way) authentication

listener 8883 192.168.5.1
log_dest syslog
cafile /etc/mosquitto/certs/ca.crt
certfile /etc/mosquitto/certs/server.crt
keyfile /etc/mosquitto/certs/server.key
require_certificate true

Example

Companion example code available in Github, here and here. We’ll also need server credentials, I left a set here so we can do this easily.

MQTT sobre TLS-PSK con ESP32 y Mongoose-OS

Este artículo es una extensión de este otro; te recomiendo que lo veas primero.

Para mayor información sobre el cliente MQTT y la operación sin TLS, existe este artículo. Para más información sobre TLS, éste.

TLS-PSK

Existe una solución un poco más simple a la que vimos en el primer artículo; consiste en utilizar, en vez de certificados, una clave pre-compartida entre el broker y el dispositivo que se conecta.

El proceso de conexión es similar al empleado con certificados, sólo que en vez de validarse éstos y luego generarse una clave derivada, se utiliza como punto de partida la clave pre-compartida. Según el esquema utilizado, se evitan las costosas operaciones de clave pública/privada (Public Key Cryptography), y la logística de manejo de claves suele ser más simple, además del hecho de no requerir una CA (Certification Authority).

Si bien existen al momento tres formas de operar, una de las cuales permite validar al broker mediante certificados y al dispositivo mediante clave pre-compartida (PSK), sólo hemos probado la forma simple.

Configuración

Configuramos el ESP32 con Mongoose-OS para operar mediante TLS-PSK.

libs:
  - origin: https://github.com/mongoose-os-libs/mqtt  # incorpora el cliente MQTT
config_schema:
  - ["mqtt.enable", true]             # Habilita el cliente MQTT
  - ["mqtt.server", "address:port"]   # Dirección IP del broker a utilizar
  - ["mqtt.ssl_psk_identity", "bob"]  # identidad para la clave elegida
  - ["mqtt.ssl_psk_key", "000000000000000000000000deadbeef"] # clave AES-128 (ó 256)
  - ["mqtt.ssl_cipher_suites", "TLS-PSK-WITH-AES-128-CCM-8:TLS-PSK-WITH-AES-128-GCM-SHA256:TLS-ECDHE-PSK-WITH-AES-128-CBC-SHA256:TLS-PSK-WITH-AES-128-CBC-SHA"] # claves utilizables

El puerto comúnmente utilizado es 8883. El broker puede además solicitar que utilicemos nombre de usuario y password, aunque lo más común es configurarlo para aprovechar la identidad que se envía, como hicimos para estas pruebas (ejemplo más abajo).

Respecto a las cipher suites, se trata de indicar un conjunto de esquemas criptográficos que el sistema soporta y entre ellos debemos acertar a elegir uno que esté soportado por el broker. Este parámetro es obligatorio, sin él el dispositivo no anuncia ningún esquema criptográfico compatible con TLS-PSK y la conexión TLS no se establece. Lo habitual es acordarlo con el administrador del broker.

Al iniciar la conexión TLS, el dispositivo incluye los esquemas soportados en el mensaje ClientHello; el broker elige uno compatible y lo indica en el mensaje ServerHello. Dado que esta lista la obtuvimos analizando el código fuente, decidimos publicarla aquí para mayor utilidad. En nuestro caso en particular sólo uno de los esquemas coincidió con los disponibles en el broker: TLS-PSK-WITH-AES-128-CCM-8. El handshake de inicialización conteniendo estos mensajes puede observarse en la captura Wireshark que figura más abajo.

Por último, la clave pre-compartida (PSK, parámetro ssl_psk_key) debe tener una longitud de 128-bits (16-bytes) para sets basados en AES-128 y de 256-bits (32-bytes) para sets basados en AES-256.

Operación

Al iniciar el procesador, observaremos en el log si todo funciona como debe, o los errores que se hayan producido. En este último caso, resulta bastante difícil determinar las causas sin un sniffer dado que las pistas de ambos lados no suelen ser muy precisas. Tanto el handshake como la operación MQTT dentro de TLS pueden observarse en un sniffer, ingresando dicha clave en el mismo (por ejemplo Wireshark, ejemplo más abajo).

[Mar 31 17:28:32.349] mgos_mqtt_conn.c:435    MQTT0 connecting to 192.168.5.3:8883
[Mar 31 17:28:32.368] mongoose.c:4906         0x3ffc76ac ciphersuite: TLS-PSK-WITH-AES-128-CBC-SHA
[Mar 31 17:28:32.398] mgos_mqtt_conn.c:188    MQTT0 TCP connect ok (0)
[Mar 31 17:28:32.411] mgos_mqtt_conn.c:235    MQTT0 CONNACK 0
[Mar 31 17:28:32.420] init.js:34              MQTT connected
[Mar 31 17:28:32.434] init.js:26              Published:OK topic:/this/test/esp32_807A98 msg:CONNECTED!

Brokers: Mosquitto

Detallamos, a modo instructivo y como ayuda rápida, la configuración mínima necesaria para operar en Mosquitto. El path está en formato GNU/Linux y se espera que pongamos nuestro archivo con las claves allí.

listener 8883 192.168.5.1
log_dest syslog
use_identity_as_username true # evitamos que requiera usuario en el header MQTT
psk_file /etc/mosquitto/pskfile
psk_hint cualquiera           # cualquier nombre

El parámetro psk_hint, en el caso que el cliente se conecte a varios lugares, le da un indicio (hint) de qué identidad utilizar para identificarse. No tiene utilidad en nuestro caso.

El archivo pskfile, por su parte, debe contener las identidades y claves pre-compartidas; por ejemplo, para el usuario bob:

bob:000000000000000000000000deadbeef

Ejemplo

El código de ejemplo se encuentra en Github.

Sniffers: Wireshark

En todo sniffer, veremos el tráfico TLS pero no lo que éste transporta

Captura simple

En Wireshark, poder decodificar el tráfico TLS-PSK es tan simple como ingresar la clave compartida en Edit->Preferences->Protocols->TLS->Pre-Shared-Key.

Ingresamos la clave pre-compartida

El sniffer es entonces capaz de descifrar el contenido y nos permite observar el tráfico MQTT.

Captura descifrada

MQTT sobre TLS con ESP32 y Mongoose-OS

Mongoose-OS incorpora un cliente MQTT con soporte TLS. Esto nos permite por un lado autenticar al servidor, y por otro que la infraestructura del servidor pueda autenticar la identidad de esas conexiones, es decir, que realmente sean usuarios autorizados.

Para mayor información sobre el cliente MQTT y la operación sin TLS, existe este artículo. Para más información sobre TLS, éste.

Configuración

Configuramos el ESP32 con Mongoose-OS para tener un cliente MQTT y conectarse como cliente a una red WiFi. Dado que debemos conectarnos a un servidor, ésta nos resulta la forma tal vez más rápida y simple de realizar las pruebas y explicar la operación. La configuración puede realizarse manualmente mediante RPC, en un archivo de configuración JSON; o definirla en el archivo YAML que describe el proyecto. Para las pruebas elegimos esta última opción.

libs:
  - origin: https://github.com/mongoose-os-libs/mqtt  # incorpora el cliente MQTT
config_schema:
  - ["mqtt.enable", true]            # Habilita el cliente MQTT
  - ["mqtt.server", "address:port"]  # Dirección IP del broker a utilizar
  - ["mqtt.ssl_ca_cert", "ca.crt"]   # Certificado del broker, requerido
  - ["mqtt.ssl_cert", "sandboxclient.crt"]  # nuestro certificado, para autenticación mutua
  - ["mqtt.ssl_key", "sandboxclient.key"]   # nuestra clave, para autenticación mutua

El puerto comúnmente utilizado es 8883. El broker puede además solicitar que utilicemos nombre de usuario y password, los detalles de la configuración completa los podemos encontrar en la página de Mongoose-OS. Finalmente, quien decide qué tipo de autenticación (simple o mutua) utilizamos es el broker, aunque nosotros debemos proveer el certificado cuando es requerido.

Operación

Antes de compilar y ejecutar, es conveniente tener un cliente conectado al broker para poder observar el mensaje enviado al momento de conexión. Hemos utilizado un broker instalado en nuestro lab, y nos conectamos a él sin autenticación, por lo que lo mostrado en el artículo sobre MQTT vale para éste también

Luego de compilado el código (mos build) y grabado el microcontrolador (mos flash) mediante mos tool, observaremos en el log si todo funciona como debe, o los errores que se hayan producido. Recordemos que debemos configurar las credenciales para conectarnos por WiFi a nuestra red (SSID y clave) y la dirección y port del broker MQTT que vayamos a utilizar. Al final de la nota comentamos cómo utilizar Mosquitto.

Autenticación simple

De esta forma autenticamos al servidor, es decir, podemos confiar en que es el que esperamos que sea, pero el servidor no tiene idea de quién podemos llegar a ser nosotros.

Es la configuración más simple y no debemos tomar ningún recaudo más allá de informar el nombre del archivo que contiene el certificado de la CA almacenado en el directorio fs en el parámetro ssl_ca_cert, esto indica que se deberá validar al broker.

[Mar 31 17:21:18.360] mgos_mqtt_conn.c:435    MQTT0 connecting to 192.168.5.3:8883
[Mar 31 17:21:18.585] mongoose.c:4906         0x3ffca41c ciphersuite: TLS-ECDHE-RSA-WITH-AES-128-GCM-SHA256
[Mar 31 17:21:20.404] mgos_mqtt_conn.c:188    MQTT0 TCP connect ok (0)
[Mar 31 17:21:20.414] mgos_mqtt_conn.c:235    MQTT0 CONNACK 0
[Mar 31 17:21:20.423] init.js:34              MQTT connected
[Mar 31 17:21:20.437] init.js:26              Published:OK topic:/this/test/esp32_807A98 msg:CONNECTED!

Autenticación mutua

De esta forma autenticamos tanto al servidor como al cliente, es decir, ahora el servidor sabe que deberíamos ser quien nuestro certificado dice que somos. Este doble proceso requiere bastante procesamiento y lo notaremos en el tiempo de establecimiento de la conexión. En esta configuración deberemos proveer nuestro certificado y clave en el directorio fs, además de configurar los parámetros ssl_cert y ssl_key; caso contrario el broker puede que nos dé una pista en el log, como lo hace Mosquitto:

Mar 31 17:30:52 Server mosquitto[2694]: OpenSSL Error: error:140890C7:SSL routines:ssl3_get_client_certificate:peer did not return a certificate 

Brokers: Mosquitto

Detallamos, a modo instructivo y como ayuda rápida, las configuraciones mínimas necesarias para operar en Mosquitto. Los paths están en formato GNU/Linux y se espera que pongamos nuestros certificados allí.

Autenticación simple (del broker)

listener 8883 192.168.5.1
log_dest syslog
cafile /etc/mosquitto/certs/ca.crt
certfile /etc/mosquitto/certs/server.crt
keyfile /etc/mosquitto/certs/server.key

Autenticación mutua

listener 8883 192.168.5.1
log_dest syslog
cafile /etc/mosquitto/certs/ca.crt
certfile /etc/mosquitto/certs/server.crt
keyfile /etc/mosquitto/certs/server.key
require_certificate true

Ejemplo

El código de ejemplo se encuentra en Github, aquí y aquí. Vamos a necesitar además las credenciales del servidor, dejé unas aquí para simplificar la operatoria.

Conectándonos a HiveMQ Cloud Basic con Mongoose-OS

HiveMQ Cloud es un servicio de broker MQTT basado en HiveMQ, un excelente broker MQTT desarrollado por la empresa del mismo nombre. Es posible utilizar HiveMQ ejecutándolo en nuestros servidores, o podemos aprovechar la infraestructura de HiveMQ Cloud y pagar un plan de acuerdo a nuestras necesidades.

HiveMQ Cloud Basic es gratuito para hasta 100 conexiones concurrentes (al momento de escribir este artículo), lo cual es muy útil para nosotros los desarrolladores, a fin de poder realizar rápidas pruebas de concepto en un ambiente estable. Incluso también es posible comenzar con la opción gratuita y luego migrar al servicio pago una vez que el negocio comienza a ganar momento.

El broker cumple con el standard MQTT 5, y contiene todo lo que se espera de él, incluyendo QoS2, mensajes “de última voluntad” y retención de mensajes. Las conexiones utilizan TLS en modalidad de autenticación del servidor, no se utilizan certificados para los clientes, las credenciales válidas son un nombre de usuario y un password creados en la consola web.

Para más información, podemos leer la Quick Start Guide.

Configuración

En mos.yml, agregamos el nombre del broker y el puerto, el certificado de la CA para TLS, y la pareja usuario/password. El nombre del broker lo obtenemos al ver los detalles de nuestro cluster en la consola de HiveMQ. La pareja de credenciales usuario/password la configuramos en dicha consola, en la sección de control de acceso (Access Management).

config_schema:
  - ["mqtt.enable", true]
  - ["mqtt.server", "blablabla.hivemq.cloud:8883"]
  - ["mqtt.user", "username"]                        
  - ["mqtt.pass", "password"]                       
  - ["mqtt.ssl_ca_cert", "trustid-x3-root.pem"]      

Para mayor información sobre MQTT sobre TLS te recomiendo este otro artículo.

Ejemplo

En Github disponemos de un ejemplo funcional. Es un simple script mJS que publica un pequeño mensaje cuando se establece la conexión con el broker.

El certificado de la CA lo hemos incluido entre los archivos de dicho ejemplo, en caso que tengamos algún problema con él, la documentación de HiveMQ Cloud nos explica cómo obtenerlo, pero al parecer debemos estar registrados para acceder porque es parte de la consola. Mongoose-OS requiere que se configure el certificado para saber que debe iniciar TLS y validar a su vez el certificado del broker.

Si todo sale bien, luego de compilar ejecutando mos build y grabar ejecutando mos flash veremos esto ejecutando mos console:

[May 21 14:57:38.806] mgos_mqtt_conn.c:468    MQTT0 connecting to numerolargo enhexa.s1.eu.hivemq.cloud:8883
[May 21 14:57:38.841] mgos_mongoose.c:66      New heap free LWM: 210876
[May 21 14:57:39.350] mg_ssl_if_mbedtls.c:30  0x3ffc8818 ciphersuite: TLS-ECDHE-RSA-WITH-AES-128-GCM-SHA256
[May 21 14:57:40.741] SW ECDH curve 3
[May 21 14:57:41.170] mgos_mongoose.c:66      New heap free LWM: 191588
[May 21 14:57:41.467] mgos_mqtt_conn.c:227    MQTT0 TCP connect ok (0)
[May 21 14:57:41.733] mgos_mqtt_conn.c:271    MQTT0 CONNACK 0
[May 21 14:57:41.742] init.js:34              MQTT connected
[May 21 14:57:41.756] init.js:26              Published:OK topic:/this/test/esp32_807A98 msg:CONNECTED!

Si disponemos de un cliente como mosquitto_sub client, o algún otro de nuestro agrado, podemos conectarnos al broker para ver que todo funcione bien. En nuestro caso, hemos utilizado CentOS 7 y el cliente mosquitto requiere que además se le especifique dónde hallar el certificado de la CA:

$ mosquitto_sub -h somelonghexnumber.s1.eu.hivemq.cloud -p 8883 -t "#" -u yourusername -P yourpassword --cafile pathto/isrgrootx1.pem -v
	/this/test/esp32_807A98 CONNECTED!

MQTT with the ESP32 and Mongoose-OS

Mongoose-OS has a built-in MQTT client and a simple mJS (a reduced JavaScript) interpreter. These tools allow us to quickly and easily connect to an MQTT broker and perform our proof-of-concept tests for more complex applications.

Configuration

We’ll configure the ESP32 running Mongoose-OS to use the MQTT client and connect to a WiFi network. Since we are going to connect to a server (the MQTT broker), this is perhaps the simplest and fastest way to run our tests. This action can be done manually using RPCs (Remote Procedural Calls), writing a JSON config file, or it can be defined in the YAML file that describes how the project will be built. We’ve chosen this last option for our tests.

libs:
  - origin: https://github.com/mongoose-os-libs/mqtt  # Include the MQTT client
config_schema:
  - ["mqtt.enable", true]            # Enable the MQTT client
  - ["mqtt.server", "address:port"]  # Broker IP address (and port)

The most common port for MQTT is 1883. The broker can also ask us to send a username and password, full configuration details are available at the corresponding Mongoose-OS doc page.

Operation

Before we build our project and execute our code, it is perhaps convenient to have an MQTT client connected to the broker, so we can see the message the device will send at connect time. We’ve used a broker we installed in a server in our lab:

$ mosquitto_sub -h mqtt.lab -p 1883 -t "#" -v

In addition (if daily traffic allows), it is also possible to use Eclipse’s open MQTT broker, in that case we should be a bit more specific in the topic we subscribe to, in order to try to receive only our messages

$ mosquitto_sub -h mqtt.eclipseprojects.io -p 1883 -t "/this/#" -v

After the code is compiled and linked (mos build) and the microcontroller’s flash is programmed (mos flash) using mos tool, we’ll watch the log and check if everything is going on as it should, or catch any possible errors. Remember we need to configure the proper access credentials to connect to our WiFi network of choice (SSID and password), and the address and port for the MQTT broker we are going to use.

[Feb 11 15:19:42.353] mgos_mqtt_conn.c:435    MQTT0 connecting to mqtt.sensors.lab:1883
[Feb 11 15:19:42.370] mgos_mqtt_conn.c:188    MQTT0 TCP connect ok (0)
[Feb 11 15:19:42.380] mgos_mqtt_conn.c:235    MQTT0 CONNACK 0
[Feb 11 15:19:42.385] mgos_mqtt_conn.c:168    MQTT0 sub /this/sub @ 1
[Feb 11 15:19:42.393] init.js:38              MQTT connected
[Feb 11 15:19:42.407] init.js:26              Published:OK topic:/this/pub/esp32_807A98 msg:CONNECTED!

At this time we’ll see that message in our MQTT client window:

$ mosquitto_sub -h mqtt.lab -p 1883 -t "#" -v
/this/pub/esp32_807A98 CONNECTED!

Then, we can send a message to our device by publishing to the topic to which it is subscribed:

$ mosquitto_pub -t /this/sub -h mqtt.lab -m "This message"

At this time we’ll see that message in our MQTT client window:

$ mosquitto_sub -h mqtt.lab -p 1883 -t "#" -v
/this/pub/esp32_807A98 CONNECTED!
/this/sub This message

and in our device’s log

[Feb 11 15:20:02.647] init.js:32              Got a msg: This message

Finally, we’ll power off our ESP32 and after a while (minutes) the broker will detect the disconnection; at that time we’ll see the last-will message in our MQTT client window

$ mosquitto_sub -h mqtt.lab -p 1883 -t "#" -v
/this/pub/esp32_807A98 CONNECTED!
/this/sub This message
/this/test lost

The mJS code

Whenever we want to publish a message, we’ll call MQTT.pub(). There’s no need to wait nor perform any handshakes, just invoke that method and see the results. Internally, the message is queued and will be sent as soon as possible; the value returned by the publishing method is an indicator of the result of the queuing action, not the actual transmission of the message.

This article has companion code, there we’ve written a simple function as a usage example:

let publish = function (topic, msg) {
    let ok = MQTT.pub(topic, msg, 1, false); // QoS = 1, do not retain
    Log.print(Log.INFO, 'Published:' + (ok ? 'OK' : 'FAIL') + ' topic:' + topic + ' msg:' +  msg);
    return ok;
};

let device_id = Cfg.get('device.id');
publish('/this/pub/'+device_id,'CONNECTED!');

Should we want our message to be retained, the fourth parameter for the MQTT.pub() method call must be true.

To receive messages, we subscribe to the desired topic invoking the MQTT.sub() method. Its second parameter is a handler for a callback function that will be run when we get a message. The following example can also be found in the companion code:

MQTT.sub('/this/sub', function(conn, topic, msg) {
    Log.print(Log.INFO, 'Got a msg: ' + msg);
}, null);

Last-will messages

If we want to configure a “last-will message”, that is, a message that will be published by the broker in our behalf when it detects we are no longer connected, we can do it this way:

  - ["mqtt.will_topic", "/this/test"]
  - ["mqtt.will_message", "lost"]

For some applications it is required that this message is also retained by the broker, so if other clients connect after we disconnected and before we reconnect, they can receive that message, which will in turn inform them that we are not available at that time.

  - ["mqtt.will_retain", true]

Retain, persistence

Message retention (be them last-will or common messages with the retain flag set) requires an MQTT broker with persistence capability, that is, with a database in which to store the latest messages that have been marked as persistent in every topic and send them to whoever client subscribes to that topic when it does so.

In our case, we’ve used Eclipse Mosquitto as our broker, but there are other available options.

When using Mosquitto, to configure persistence we need to add

persistence true

to the config file (if we search for it, we’ll find it). It is also possible that we have to add the name and path to the persistence database (paths in GNU/Linux environment form):

persistence_file mosquitto.db
persistence_location /var/lib/mosquitto/

but that will depend on our distro, it may already be configured as default. The user running the Mosquitto process has to have write permission on this database.

Example

The companion example code is available at Github.

MQTT con ESP32 y Mongoose-OS

Mongoose-OS incorpora un cliente MQTT y un simple intérprete mJS (una versión reducida de JavaScript). Con ellos podemos rápida y fácilmente conectarnos a un broker MQTT y realizar pruebas de concepto de aplicaciones más complejas.

Configuración

Configuramos el ESP32 con Mongoose-OS para tener un cliente MQTT y conectarse como cliente a una red WiFi. Dado que debemos conectarnos a un servidor, ésta nos resulta la forma tal vez más rápida y simple de realizar las pruebas y explicar la operación. La configuración puede realizarse manualmente mediante RPC, en un archivo de configuración JSON; o definirla en el archivo YAML que describe el proyecto. Para las pruebas elegimos esta última opción.

libs:
  - origin: https://github.com/mongoose-os-libs/mqtt  # incorpora el cliente MQTT
config_schema:
  - ["mqtt.enable", true]            # Habilita el cliente MQTT
  - ["mqtt.server", "address:port"]  # Dirección IP del broker a utilizar

El puerto comúnmente utilizado es 1883. El broker puede además solicitar que utilicemos nombre de usuario y password, los detalles de la configuración completa los podemos encontrar en la página de Mongoose-OS.

Operación

Antes de compilar y ejecutar, es conveniente tener un cliente conectado al broker para poder observar el mensaje enviado al momento de conexión. Hemos utilizado un broker instalado en nuestro lab:

$ mosquitto_sub -h mqtt.lab -p 1883 -t "#" -v

También (si el tráfico habitual lo permite) es posible usar el broker abierto de Eclipse , en cuyo caso deberemos limitar un poco el tópico a suscribirnos a fin de intentar recibir sólo nuestros mensajes

$ mosquitto_sub -h mqtt.eclipseprojects.io -p 1883 -t "/this/#" -v

Luego de compilado el código (mos build) y grabado el microcontrolador (mos flash) mediante mos tool, observaremos en el log si todo funciona como debe, o los errores que se hayan producido. Recordemos que debemos configurar las credenciales para conectarnos por WiFi a nuestra red (SSID y clave) y la dirección y port del broker MQTT que vayamos a utilizar.

[Feb 11 15:19:42.353] mgos_mqtt_conn.c:435    MQTT0 connecting to mqtt.sensors.lab:1883
[Feb 11 15:19:42.370] mgos_mqtt_conn.c:188    MQTT0 TCP connect ok (0)
[Feb 11 15:19:42.380] mgos_mqtt_conn.c:235    MQTT0 CONNACK 0
[Feb 11 15:19:42.385] mgos_mqtt_conn.c:168    MQTT0 sub /this/sub @ 1
[Feb 11 15:19:42.393] init.js:38              MQTT connected
[Feb 11 15:19:42.407] init.js:26              Published:OK topic:/this/pub/esp32_807A98 msg:CONNECTED!

En este momento observaremos el mensaje en nuestro cliente:

$ mosquitto_sub -h mqtt.lab -p 1883 -t "#" -v
/this/pub/esp32_807A98 CONNECTED!

A continuación, enviamos un mensaje a nuestro dispositivo publicando uno en el tópico al que éste se halla suscripto:

$ mosquitto_pub -t /this/sub -h mqtt.lab -m "This message"

En este momento observaremos el mensaje en nuestro cliente

$ mosquitto_sub -h mqtt.lab -p 1883 -t "#" -v
/this/pub/esp32_807A98 CONNECTED!
/this/sub This message

y en el log de nuestro dispositivo

[Feb 11 15:20:02.647] init.js:32              Got a msg: This message

Finalmente, apagamos nuestro ESP32 y al cabo de unos minutos el broker detectará la desconexión; en ese momento observaremos el mensaje “de última voluntad” en nuestro cliente

$ mosquitto_sub -h mqtt.lab -p 1883 -t "#" -v
/this/pub/esp32_807A98 CONNECTED!
/this/sub This message
/this/test lost

El código mJS

Cuando queremos publicar algo, invocamos el método MQTT.pub(). No debemos esperar ni hacer handshakes, sólo llamarlo y observar el resultado. Internamente el mensaje es puesto en una cola, de donde saldrá cuando sea posible. El valor devuelto indica que ha sido posible encolar el mensaje, no que éste ha llegado a destino. En el código que acompaña a este artículo creamos una función como ejemplo de uso:

let publish = function (topic, msg) {
    let ok = MQTT.pub(topic, msg, 1, false); // QoS = 1, do not retain
    Log.print(Log.INFO, 'Published:' + (ok ? 'OK' : 'FAIL') + ' topic:' + topic + ' msg:' +  msg);
    return ok;
};

let device_id = Cfg.get('device.id');
publish('/this/pub/'+device_id,'CONNECTED!');

Si queremos que el mensaje sea retenido, el cuarto parámetro de MQTT.pub() debe ser verdadero.

Para recibir mensajes, nos suscribimos al tópico deseado usando el método MQTT.sub(). El segundo parámetro es un handler a una función callback que se ejecutará cuando recibamos un mensaje. En el código que acompaña a este artículo mostramos un ejemplo de uso:

MQTT.sub('/this/sub', function(conn, topic, msg) {
    Log.print(Log.INFO, 'Got a msg: ' + msg);
}, null);

Last will, mensajes “de última voluntad”

Si deseamos configurar una “última voluntad”, es decir, un mensaje que el broker publicará por nosotros ante la detección de una desconexión, podemos hacerlo como se ve a continuación:

  - ["mqtt.will_topic", "/this/test"]
  - ["mqtt.will_message", "lost"]

En algunas aplicaciones es necesario que este mensaje sea retenido por el broker, de modo que otros clientes que se conecten luego de nuestra desconexión y antes de nuestra reconexión puedan recibir dicho mensaje, que por lo general tiene la misión de indicar que no estamos disponibles.

  - ["mqtt.will_retain", true]

Retain, persistencia

La retención de mensajes (sean “de última voluntad” o mensajes corrientes con el flag retain seteado) requiere de un broker MQTT con capacidad de persistencia (persistence), es decir, con una base de datos que almacene los últimos mensajes marcados como persistentes y los retransmita a quien se suscribe al tópico correspondiente al momento de iniciar la suscripción.

En nuestro caso hemos utilizado como broker Eclipse Mosquitto, pero hay otras opciones.

En el caso de Mosquitto, para configurar la persistencia debemos agregar

persistence true

en el archivo de configuración (si lo buscamos lo encontramos). También es posible que además debamos agregar el nombre y ubicación de la base de datos de persistencia (paths en formato ambiente GNU/Linux):

persistence_file mosquitto.db
persistence_location /var/lib/mosquitto/

pero eso depende de la distribución que utilicemos, por lo que puede que ya esté hecho por defecto. El usuario bajo el cual se ejecuta el proceso debe tener permisos de escritura a esta base de datos.

Ejemplo

El código de ejemplo se encuentra en Github.

Connecting to HiveMQ Cloud Basic with Mongoose-OS

HiveMQ Cloud is “the live version” of HiveMQ, an excellent MQTT broker from the company of the same name. You can have HiveMQ running in your servers, or you can take advantage of the HiveMQ Cloud infrastructure and pay a plan according to your business needs.

HiveMQ Cloud Basic is free for up to 100 concurrent connections (at the time I wrote this…), which is great for us developers for quick and stable proof-of-concept stuff. You can even start with this and move to a paid service once your business starts gathering momentum.

The broker is a full fledged MQTT 5 broker with everything you expect, including QoS2, last will and retained messages. Connections use TLS in server authentication mode, there is no user certificate, valid credentials are a username and password pair created at the web console.

For more info, read their Quick Start Guide.

Configuration

In mos.yml, we need to add the broker name and port, the CA certificate for TLS, and a user/password set of credentials. The broker hostname we get it from our cluster details at the HiveMQ console. The set of credentials we will configure there in the Access Management section.

config_schema:
  - ["mqtt.enable", true]
  - ["mqtt.server", "yarayarayara.hivemq.cloud:8883"]
  - ["mqtt.user", "username"]                        
  - ["mqtt.pass", "password"]                       
  - ["mqtt.ssl_ca_cert", "trustid-x3-root.pem"]      

If you need more information on using MQTT over TLS, read this article.

Example

You can find a working example at Github. It is a simple mJS script that publishes a small message once a connection is established.

The CA certificate has been included, in case of trouble check the HiveMQ Cloud docs for the cloud console (for registered users), there you’ll find how to get a fresh copy. Mongoose-OS requires the certificate to recognize it has to initiate the TLS client handshake and to be able to validate the server certificate.

If everything goes fine, after we mos build and mos flash we’ll see this in mos console:

[May 21 14:57:38.806] mgos_mqtt_conn.c:468    MQTT0 connecting to somelonghexnumber.s1.eu.hivemq.cloud:8883
[May 21 14:57:38.841] mgos_mongoose.c:66      New heap free LWM: 210876
[May 21 14:57:39.350] mg_ssl_if_mbedtls.c:30  0x3ffc8818 ciphersuite: TLS-ECDHE-RSA-WITH-AES-128-GCM-SHA256
[May 21 14:57:40.741] SW ECDH curve 3
[May 21 14:57:41.170] mgos_mongoose.c:66      New heap free LWM: 191588
[May 21 14:57:41.467] mgos_mqtt_conn.c:227    MQTT0 TCP connect ok (0)
[May 21 14:57:41.733] mgos_mqtt_conn.c:271    MQTT0 CONNACK 0
[May 21 14:57:41.742] init.js:34              MQTT connected
[May 21 14:57:41.756] init.js:26              Published:OK topic:/this/test/esp32_807A98 msg:CONNECTED!

If we have a mosquitto_sub client, or some other we like, we can connect to the broker to see everything is working. In my case, I user CentOS 7 and the mosquitto client requires also specifying the CA certificate:

$ mosquitto_sub -h somelonghexnumber.s1.eu.hivemq.cloud -p 8883 -t "#" -u yourusername -P yourpassword --cafile pathto/isrgrootx1.pem -v
	/this/test/esp32_807A98 CONNECTED!

En castellano (Spanish support)

En este post voy a reunir los artículos al respecto que escribí para Cika Electrónica en mi último tiempo con ellos. De hecho se trata de links a su servidor…

No trabajo más en Cika y no creo que vaya a escribir otros artículos en castellano en el futuro, a menos que aparezca un mecenas (o conjunto de ellos) que incline el uso de mi tiempo en esa dirección mediante su aporte económico voluntario. Ergo, disfrutad de este contenido mientras aprendéis inglés o armáis una sociedad de fomento ad hoc.

Intro al ESP32, bastante desactualizada

“edGarDo”, una nota de aplicación con una idea de cómo hacer un control de portón de garage usando BLE e incorporándolo a openHAB para obtener control mediante Google Assistant y Alexa sin esfuerzo

Configuraciones de autenticación Enterprise en WiFi con el ESP32, y el software

Autenticación en servidor HTTP: el texto y el software

Cómo usar TLS en el servidor HTTP: texto y software

Cómo usar TLS con el cliente MQTT: texto, software

Mongoose-OS tiene un esquema del tipo RPC (Remote Procedure Call) que entre otras cosas podemos decir que cumple la función de los CGI en un servidor HTTP. Cómo manejar la autorización: texto de la nota, código asociado

Cómo usar las RPC por WebSocket: nota, código

Usando las RPC con MQTT, o cómo controlar un ESP32 atrás de un firewall: texto, código

Configuración de un cliente SNTP, o cómo poner nuestro ESP32 en hora: nota, código de la nota

Guardando datos en la flash mediante un log: nota, código

Conectándonos a la Google Cloud Platform con un ESP32 usando MQTT: texto, código

Aprovechando las RPC para controlar un dispositivo conectado a la red de Google: texto, código

Conectándonos a la red de Amazon (AWS IoT Core): texto, código